Sunday 20 December 2015

Gingerbread houses


It isn’t Christmas without gingerbread and, much as I always love classic gingerbread men...


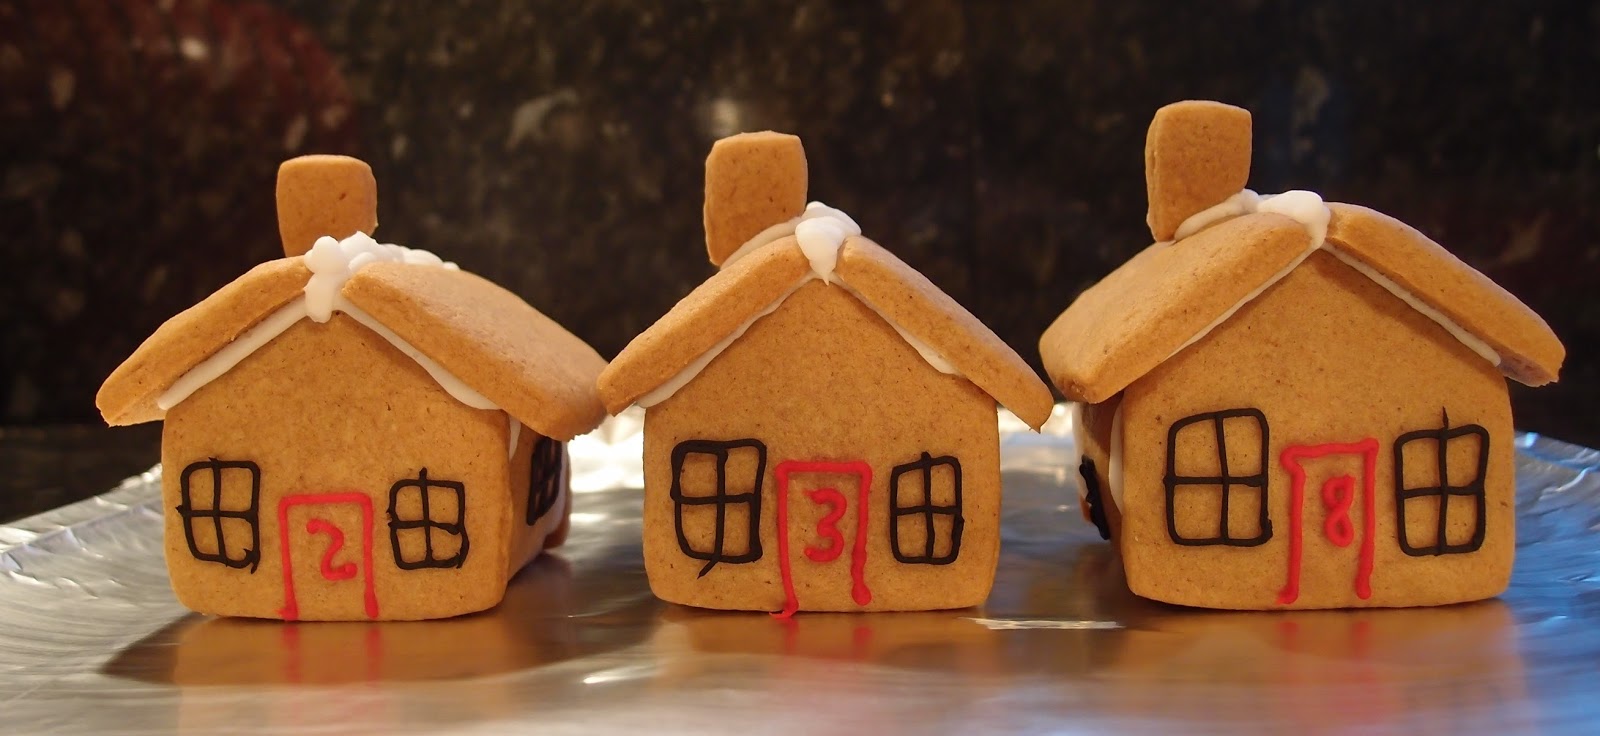
... I wanted to make something different to anything I’d made before.  I found this shop on Etsy selling cutters to make the cutest little gingerbread houses and I fell in love!  (Etsy is an incredible site; I know it gets some stick for some of the weird stuff you can find on it but I challenge anyone to spend 20 minutes or so browsing the site without finding something they want!)


The houses are a bit of work but can be made in stages, as gingerbread keeps very well for days and days in an airtight tin.  I always prefer piping on a flat surface so decorate all the panels and let the icing set, before assembling the houses.  As these are small they don’t require much icing to hold them together.


To provide a bit of scale, here’s a house next to my favourite mug (I dread to think how many cups of tea this cup has held!):


I’m not much of a decorator and – weak and pathetic as it sounds – get hand cramps if I do too much piping, so my houses are minimalist, but, if you’re better at that sort of thing you could really go to town.


The gingerbread was lovely – it was somewhere between ginger biscuit and the softer, more cakey, gingerbread.  It puffed up while cooking giving a nice smooth finish and the taste had just enough fire to it.  I don’t think it’s been a very exciting year for cookery books but this recipe came from one book that did capture my interest – Gingerbread Wonderland by Mima Sinclair.


This is likely to be my last post before Christmas so I shall sign off hoping that you all have a lovely day – doing whatever it is you have chosen to do! Happy Christmas everyone!


Ingredients

140g golden syrup
200g soft light brown sugar
200g unsalted butter
4 teaspoons ground ginger
2 teaspoon ground cinnamon
1 teaspoon ground nutmeg
1 teaspoon bicarbonate of soda
500g plain flour
1 teaspoon salt
1 egg

To decorate: tubes of icing, and anything else you wish!


Method

Place the golden syrup, sugar, butter and spices in a saucepan larger than you need and melt together over a gentle heat stirring all the time until the sugar has dissolved – you can tell when this has happened by looking at the back of your spoon: if you can still see tiny grains it needs a bit longer.

Increase the heat and bring to the boil (don’t stir during this process).

Remove the pan from the heat and beat in the bicarbonate of soda – it will froth up, hence using a larger saucepan.

Stir only until the bicarbonate of soda is incorporated and put to one side to cool – about 15 minutes should be enough.

Fold the flour and salt into the cooled mixture.

Beat in the egg – take care not to overbeat the mixture; as soon as the egg is incorporated stop mixing.

Tip the dough out onto a work surface or – and this is my preference – a sheet of non stick foil.

Knead until it is smooth.  Initially the dough will be very sticky and it will be tempting to add flour but DON’T!  This will make the biscuit tough.

Cut the dough in half and shape into fat discs before wrapping separately in clingfilm and refrigerating for 1 hour.

Preheat the oven to 160C/fan oven 140C/325F/gas mark 3.

Roll the chilled dough out between two sheets of clingfilm and use the cutters of your choice.

Place on a baking sheet lined with either baking paper or non stick foil.

Bake for about 6-7 minutes, if making a small biscuit, or until just starting to feel firm to the touch.  It will puff up during cooking and if it feels almost marshmallow soft, it needs a couple of minutes longer.

Leave to cool for at least 10 minutes on the baking sheet before moving to a wire rack to cool completely.

Decorate as you wish.

Bask in the glory of the wonderful thing you have created.

Eat.


Sunday 13 December 2015

Chocolate Christmas pudding cupcakes


As much as I love daydreaming about having a Nigella-style existence where I can spend days in my perfect kitchen crafting masterpieces the reality is that, if you work full time, and factor in all the other stuff you have to do,  time is short – particularly at Christmas.  I am planning on some projects for Christmas that will be more involved but, for now, I wanted something cute and quick.


I have always loved the look of a traditional Christmas pudding but hate the taste.  Therefore, the concept of these little puds was to achieve the look I covet but made from chocolate chip cupcakes, with the inclusion of almond to ensure that they will keep well for a few days for entertaining over the festive period.  I decorated them with sugar holly leaves but you can let your imagination run wild.


In all honesty, they don’t look like puddings.  There, I’ve said it.  The design in my head didn’t quite manifest itself in the finished item.  Mostly because I went overboard with the ganache – I put on an amount that created the pudding effect, but then had lots left so was faced with the dilemma of not using it all, or adding too much to the cakes.  As Thom Yorke (never) sang: gluttony always wins.


The ganache firmed up a lot quicker than I expected – often ganache can be runny and you have to refrigerate it, but not this one.  It is extremely rich and sweet…but it’s also Christmas so do not feel any guilt!  I read an article stating that the average person consumes an additional 30,000 calories over the Christmas period.  I’m not sure whether I was meant to take that as a target to aim towards, like the 10,000 steps a day goal, but……


Ingredients

For the sponge:
175g unsalted butter, melted and left to cool
150g natural yoghurt
3 eggs
1 teaspoon vanilla extract
175g golden caster sugar
140g self raising flour
35g cocoa powder
100g ground almonds
100g chocolate chips

For the ganache:
300g white chocolate
120ml double cream

To decorate: sugar holly leaves


Method

Preheat the oven to 190C/ fan oven 170C/ 375F/ gas mark 5.

Grease 1 cupcake trays i.e. 12 holes.  You don’t want paper cases as this will stop the cupcakes having a smooth pudding like finish.

Melt the butter for the sponges and put to one side to cool.

In a jug whisk together the yoghurt, eggs and vanilla.

Place all the dry ingredients in a large mixing bowl i.e. the sugar, flour, cocoa powder, ground almonds and chocolate chips.

Pour the yoghurt mix and the melted cooled butter into the dry ingredients and fold together just enough to combine.

Spoon into the greased cupcake pans and bake for 15-18 minutes or until a skewer inserted into the sponges comes out clean.

Turn the cakes (inverted – so that the domed top is now the bottom) out onto a wire rack straightaway – I find this helps flatten the domed top as the sponges cool.

Leave to cool completely.

Now make the ganache: melt the cream and chocolate together.  There are various ways you can do this – short bursts in the microwave and stirring between each one; melting in a bowl over a pan of simmering water, making sure the bowl doesn’t touch the water; or my preferred method: in a saucepan using a gas diffuser ring.

Leave the ganache to cool and set a little.  It might require refrigeration (mine didn’t) to set up enough to spoon over the cakes but don’t forget about it as you want it to stay a bit runny.

Spoon over the top of each cake and let run down the side.

Decorate as required.

Bask in the glory of the wonderful thing you have created.


Eat.

Sunday 6 December 2015

Ginger and parsnip cake


If I were to say to Mr CC I was making a carrot cake his response would be favourable.  However, when I made courgette cakes he prejudged them negatively even though he ended up eating them and liking them.  The Brussel sprout cake was admittedly ‘interesting’ (interesting in this context = bleughhhhhh! Don’t say I didn’t warn you!) but I made that before I met him so, other than hearing scare stories from survivors, he escaped it unscathed. 


Parsnips are basically carrots that have used higher SPF sunscreen (this view might not stand up to biological scrutiny) so I was torn whether to ‘fess up to their inclusion in this cake prior to serving it.  I decided not to and instead turned it into a game of ‘this cake has an unusual ingredient – can you guess what it is?’  He didn’t.


Parsnips, like carrots, have a natural sweetness but, unlike carrots, have an earthiness that added to the depth of flavour in the cake.  I’m not sure my palate would’ve detected that it wasn’t carrot but, once you know, the taste is subtly different.  The sponge was light and soft with tiny flecks of creamy coloured parsnip visible.  It was a lovely combination with the ginger. 


I attended the BBC Good Food show at the NEC last week and bought a bottle of ginger juice.  I used some in the buttercream; ending up with 2 tablespoons of ginger juice and 2 of syrup from the jar of stem ginger.  It added an extra bit of zing and heat – I do like my ginger to leave a lasting impression on my tongue!


I have never said, thought and written the word ‘parsnip’ as much as I have whilst baking this cake.  When you think about it, it’s a pretty odd word...and gets sillier the more you say it.  Parsnip.  Paaaaarsniiiipppp.  It’s a funny word – and I like it!

 
Ingredients 

For the sponges:
250g self raising flour
1 teaspoon bicarbonate of soda
1 teaspoon baking powder
½ teaspoon salt
2 teaspoons ground ginger
250g golden caster sugar
3 balls of stem ginger, very finely chopped
3 eggs
200g grated parsnip – this equates to two average sized parsnips
1 teaspoon vanilla extract
125g unsalted butter – melted but not hot (leave to cool for about 5-10 minutes)
Splash of milk, if needed
 

For the icing:
400g icing sugar
200g unsalted butter, at room temperature
4 tablespoons stem ginger syrup from the jar
 

Method
 

Pat the oven to 180C/fan oven 160C/350F/gas mark 4.

Line two 20cm loose bottomed sandwich tins with baking paper.

Place the flour, bicarb, baking powder, salt, ground ginger and sugar in a bowl and stir together.

Add the stem ginger and stir so that it is coated with dry ingredients and not clumping together.

In a separate bowl – a large jug is easier if you have one - beat together the eggs, grated parsnip, vanilla and melted butter.

Pour the wet ingredients into the flour mix and fold together, taking care not to over mix.

If the mixture is not firm, and doesn’t drop from the spoon easily, add a splash of milk.

Spoon into the prepared tins and level the surface.

Bake for approximate 25 minutes or until a skewer inserted into the cakes comes out clean.  Mine took a bit longer – nearer 40 minutes, but it’s worth checking after 25 minutes as ovens vary.

Leave to cool in the tins for at least 20 minutes before turning out and leaving to cool completely on a wire rack.

Now make the buttercream: Beat together all the ingredients until smooth and whippy.

Place one sponge on the serving plate and use a stingy 1/3 of the buttercream to spread over the top.

Place the other sponge on top.

Use the remaining buttercream to cover the top and sides of the cake.

Place your decorated gingerbread on the cake.

Bask in the glory of the wonderful thing you have created.

Eat.