Tuesday 23 October 2007

Daring Bakers’ October Challenge

This is my first Daring Bakers’ challenge. For those who haven’t heard of the Daring Bakers, we are a group of baking fanatics from around the world who, once a month, all have to bake the same item and share our results. Group members take it in turns to set the challenge and this month Mary of Alpineberry picked Bostini Cream Pie.
I have to confess to being a little concerned when I read the recipe as I’m not a huge fan of chocolate and orange together. However, I sense this is why the DB Challenges work – you get to make something you’d ignore in a recipe book – and sometimes with surprising results.
The chiffon cakes were the most interesting part of this recipe for me; I make a lot of sponge based cakes yet had never come across chiffon cake. The mix was a particularly appealing colour; sunshine in a bowl:


This was partly because of the orange juice, but also because the only canola oil I could buy was a canola and red palm oil mix. The oil replaces butter in the recipe and the lightness comes from egg whites. Here’s my beautiful kitchenaid earning its keep:


I decided to stick to the recipe and make the cakes individually as I wasn’t sure how much extra baking time it would take to make one large cake. Plus, I think they look very cute when they’re baking. This is the mix about to go into the oven – as the recipe stated, I filled the tins almost to the top.


What I wasn’t expecting was for them to puff up quite so much. Stupid really – what else would they do with that much whipped egg white in them?


Beautiful though they looked, I was concerned that the shape wouldn’t be neat enough to pour the chocolate sauce over and get a nice smooth finish. So I tidied them up with a biscuit cutter. Much neater!


When plated up it makes a substantial dessert. I only served 5 of my 8 cakes but used all the custard and chocolate – probably very greedy but what can I say? It seemed so right at the time!


I love this photo – my ten year old nephew took a very careful spoonful out of his cake to make a good picture – he’ll be a fine Daring Baker one day! It shows the beautiful dense, but not heavy, texture of the chiffon cake and the glorious colour contrasts between the sauces and cake.


My chocolate sauce was a half and half of plain and milk chocolate to make it more child friendly. Having eaten the dessert though I don’t think it was necessary as the custard makes the chocolate creamier.
I am wondering why it has taken me until now to realise what a dream combination cold custard and hot chocolate is – how come no one has told me this before? Hurrah for the Daring Bakers!
The challenge required the chiffon cake to be flavoured orange. While I was surprised at just how much I enjoyed the delicately flavoured sponge, I have to admit that if I made this under non-challenge rules I would probably make a vanilla sponge instead but that is only because I’m a vanillaholic.

So – my first challenge met and enjoyed. Roll on November!

Bostini Cream Pie
(from Donna Scala & Kurtis Baguley of Bistro Don Giovanni and Scala's Bistro)

Makes 8 generous servings

INGREDIENTS:
Where ingredients are known by different names in the UK I’ve put this in brackets)

Custard:

3/4 cup whole milk
2 3/4 tablespoons cornstarch (cornstarch is the same as cornflour)
1 whole egg, beaten
9 egg yolks, beaten
3 3/4 cups heavy whipping cream (double or whipping cream)
1/2 vanilla bean (vanilla extract is okay)
1/2 cup + 1 tablespoon sugar
Chiffon Cake:

1 1/2 cups cake flour (If you can’t find cake flour you can make a substitute: 1 cup cake flour = plain flour and cornflour. Take a cup of plain flour and remove 2 tablespoons of it. Add 2 tablespoons of cornflour)
3/4 cup superfine sugar (caster sugar)
1 1/3 teaspoons baking powder
1/3 teaspoon salt
1/3 cup canola oil
1/3 cup beaten egg yolks (3 to 4 yolks)
3/4 cup fresh orange juice
1 1/2 tablespoons grated orange zest
1 teaspoon pure vanilla extract
1 cup egg whites (about 8 large)
1 teaspoon cream of tartar
Chocolate Glaze:

8 ounces semi or bittersweet chocolate
8 ounces unsalted butter

INSTRUCTIONS

To prepare the custard:

Combine the milk and cornstarch in a bowl; blend until smooth. Whisk in the whole egg and yolks, beating until smooth. Combine the cream, vanilla bean and sugar in a saucepan and carefully bring to a boil. When the mixture just boils, whisk a ladleful into the egg mixture to temper it, then whisk this back into the cream mixture. Cook, stirring constantly, until the mixture is thick enough to coat the back of a spoon. Strain the custard and pour into 8 large custard cups. Refrigerate to chill.

To prepare the chiffon cakes:

Preheat the oven to 325°F (170 degrees, 150 degrees fan oven). Spray 8 moulds with non-stick cooking spray. You may use 7-ounce custard cups, ovenproof wide mugs or even large foil cups. Whatever you use should be the same size as the custard cups. Sift the cake flour, sugar, baking powder and salt into a large bowl. Add the oil, egg yolks, orange juice, zest and vanilla. Stir until smooth, but do not overbeat. Beat the egg whites until frothy. Add the cream of tartar and beat until soft peaks form. Gently fold the beaten whites into the orange batter. Fill the sprayed moulds nearly to the top with the batter. Bake approximately 25 minutes, until the cakes bounce back when lightly pressed with your fingertip. Do not overbake. Remove from the oven and let cool on a wire rack. When completely cool, remove the cakes from the moulds. Cover the cakes to keep them moist.
To prepare the glaze:

Chop the chocolate into small pieces. Place the butter in a saucepan and heat until it is just about to bubble. Remove from the heat; add the chocolate and stir to melt. Pour through a strainer and keep warm. To assemble: Cut a thin slice from the top of each cake to create a flat surface. Place a cake flat-side down on top of each custard. Cover the tops with warm chocolate glaze. Serve immediately.

Monday 22 October 2007

Burnt Sugar Cake

This is a cake for when you feel like showing off because it’s a stunner. It does not however require stunning effort – it’s really just a glorified sponge sandwich.


I can’t quite decide whether I like the name ‘burnt sugar cake’; burnt always hints at a disaster. But then again ‘caramel cake’ isn’t quite dramatic enough. But I would like to stress that nothing gets burnt or charred in this recipe – unless you go wrong of course.


The sponge is rich and gooey but not sticky. The recipe is clever as you make an amount of burnt sugar and use this in both the cake and the buttercream so they complement each other perfectly and give a nice consistent taste.


It comes up a very tall cake and you will get a lot of portions from it as it is quite rich. If you’re making the cake in advance, hold off putting in the shards of burnt sugar until the last minute otherwise them may leak on the buttercream as mine have. I think it’s because the cake got too warm – next time I’ll keep it in the fridge.


Making the caramel is a little strange the first time as sugar is quite fascination as it melts. Firstly it goes a bit lumpy:


Then the bit on the bottom of the pan melts whilst the rest stays looking like sugar:


Then it sorts itself out and all of it catches up:


And you end up with this syrup:


Ingredients:
For the cake
450g caster sugar
125ml boiling water
175g unsalted butter, softened
3 eggs
300g self raising flour
1 teaspoon bicarbonate of soda
200ml soured cream

For the buttercream
125g Unsalted butter
250g icing sugar

For the burnt sugar decoration
3 tablespoons caster sugar

How to make:
- Preheat oven to 180°C/fan oven 160°C/350°F/ Gas mark 4 and grease two 20cm sandwich tins.
- Make the caramel by cooking 200g of the caster sugar over a medium heat in a saucepan, stirring occasionally until the sugar has melted. This will take a few minutes so don’t try and rush it. When it has melted let it cook, without stirring it, until it darkens.
- Remove from the heat and carefully add the boiling water. Be prepared for the mixture sizzling like mad at this point and possibly spitting at you.
- Return the pan to the heat and stir for about 1 minute until the caramel and the water are combined and smooth.
- Measure out 125ml of the caramel syrup and then pour the rest into a separate dish. Ensure that your measuring jug and bowl are heat proof as the caramel is extremely hot.
- In a large mixing bowl cream the butter with the remaining sugar (i.e. 250g) until pale and fluffy. Gradually beat in the eggs and don’t worry if the mixture curdles a little.
- In a separate bowl mix the soured cream and the 125ml of caramel together. Weigh out the flour and bicarbonate of soda.
- Fold the flour and caramel mixtures into the creamed mixture until combined. I like to do this gradually i.e. add a third of the flour and fold in, add a third of the caramel and fold in, add another third of flour etc.
- Divide the mix evenly between the two sandwich tins and bake for approx 30 minutes or until a skewer comes out clean.
- Let them cool for 10 minutes in the tins before turning out onto a cooling rack and allowing to cool completely.
- Make the icing by beating together the butter and icing sugar until thoroughly combined. Then add the remaining caramel syrup (the caramel syrup left over when you measured out the 125ml that went into the cake).
- Sandwich the cakes together with half of the buttercream and then use the rest to decorate the top.
- To make the decoration put the caster sugar in a pan and heat until it melts and turns golden. Pour onto an oiled tray, or if you prefer, a plate with non-stick foil on it. I did the latter and find it comes off well. Put it in the fridge until set and then break into random shards.
- Bask in glory at the wonderful thing you have made.
- Eat.

Monday 15 October 2007

Cherry Bakewell Tarts

I may well be lynched for saying this, but when I actually had proper Bakewell Tart from Bakewell in Derbyshire, I wasn’t that keen. I prefer the twist on the theme – the cherry bakewell which takes all the good points i.e. the pastry, the almond filling and adds sweet white icing and then, a cherry on the top.

Here’s the tart 'nude' i.e. before the icing and cherry (I'm sorry if that sentence got anyone excited and expecting something different!):


I’d been looking for a recipe that required glacé cherries since I purchased a ridiculously expensive pot of them at Borough Market . They look quite beautiful on the finished tart – quite literally the cherry on the icing on the cake!


Don’t worry about the jam bubbling up through the almond mix - as long as you ensure the almond mix completely covers the jam you won’t have any problems when baking.

The measurements set out in the recipe produced 14 tarts for me, but my tart tray is quite deep; if you use a shallow tray you may get more.

Make sure that you put the cherry on top before the icing has set so it can’t fall off:


How can they fail to please – just look at the layers: pastry, jam, almond sponge, icing, cherry. Plus, they look like a cartoon drawing of a cake; I think that if you asked a child to draw a cake most would end up with something like this.


Ingredients:
For the rich shortcrust pastry:
225g Plain flour
175g Unsalted butter, soft
1 Egg yolk
2 teaspoons caster sugar
Cold water as required – I needed only a couple of teaspoons.

For the Bakewell filling:
100g Unsalted butter
100g Caster sugar
2 Eggs
50g Ground almonds
50g Self Raising flour
1 teaspoon Almond essence (I’ve only just discovered almond extract is available from Lakeland)
Strawberry jam

For the icing:
175g Icing Sugar
1-2 tablespoons water
7 Glacé cherries (half for each tart)

How to make:

- Rub the butter into the flour until it resembles fine breadcrumbs.
- Add the egg yolk and sugar and mix with a knife (it’s more effective than a spoon).
- Add enough water to bring the dough together – you’re aiming for firm but not hard. I always use my hands to do this as it gives you better control.
- If you’ve added too much water and the dough is sticky, don’t panic – just add a little more flour.
- Wrap the pastry in clingfilm and refrigerate for at least 15 minutes.
- preheat oven to 200°C/fan oven 180°C/400°F/ Gas mark 6 and grease 14 patty tins i.e. the individual little patty indents – not 14 tins, that would be silly!
- Roll out the pastry between two sheets of greaseproof paper, this saves you having to use any extra flour. However, if you prefer, roll out on a floured board.
- Using a cutter slightly bigger than the diameter of your patty tin indents, cut out 14 circles. You will have to re-roll the pastry to get this many but it’s very good natured and will re-roll several times.
- Line the greased tins with the pastry disks and spoon some jam onto each one. I used about half a heaped teaspoon for each tart.
- Now make the almond filling. Beat the butter and sugar until pale and fluffy.
- Beat in the eggs one at a time, and after each egg, add half of the ground almonds. The mix will curdle but don’ panic – as soon as you add the flour it will correct itself.
- Add the flour and almond essence and stir well. You can just mix it – there’s no need to fold or be careful.
- Spoon the mix into each pastry case and bake for 20 minutes. Mine took exactly this time.
- Remove from the oven and leave to cool completely before removing from the tin. This is because the pastry is fragile when fresh from the oven and firms as it cools.
- Mix together the icing sugar and water until smooth and glossy – adjust the measurements as required to get the right thickness. You’re aiming for thick but still runny, opaque and glossy.
- Spoon onto the top of each tart. Before fully set, add half a glacé cherry on top.
- Bask in glory at the wonderful thing you have made.
- Eat.

Golden Syrup Dumplings

There’s that bit in Jerry Maguire - I haven’t seen the film (Tom Cruise Phobic) but it’s a very famous scene - where he launches into some romantic spiel and Rene Zellwegger goes all misty eyed and says “You had me at Hello”. Well, this could be my equivalent – this recipe had me at “Golden Syrup Dumplings”.

This is a clever recipe because from start to finish they are made on the hob. No baking at all. You spoon dessert spoonfuls of the raw dumpling mix into the syrup where they simmer and puff up to more than double their size. I’m not going to lie, these are very sweet and sticky but utterly delicious. If you’re looking for the ultimate comfort food these would be a good place to start!


I apologise that the photos for these aren’t up to the usual quality but I made them for dessert at a dinner party and neither my guests nor I could wait to eat them! I served them with ice cream but custard would work too. They are a very impressive dessert for little effort.


I admit that these are very sweet and most likely bad for you, but the one thing they are not is stodgy or doughy. This photo nicely shows the lightness of the dumpling – you can see all the air in the mix:


Ingredients:
For the dumplings (I got 8 dessert spoonfuls from this mix)
185g self raising flour
30g unsalted butter
115g golden syrup
80ml milk (whole or semi-skimmed, skimmed won’t work)

For the sauce
30g unsalted butter
165g light brown sugar
175g golden syrup
410ml water

How to make:
- Start by making the dumplings; rub the butter into the flour then gradually stir in the golden syrup and milk. You’ll end up with a stiff cake batter.
- Make the sauce by combining all the ingredients in a medium saucepan.
- Stir over a medium heat until the sugar dissolves, then bring the sauce to the boil.
- Reduce the heat and simmer for 5 minutes.
- Drop rounded dessert spoonfuls (or tablespoons) of the dumpling mixture into the simmering sauce.
- Cover and simmer for approximately 20 minutes. The dumplings will puff up and look lovely. After about 15 minutes I turned them over to ensure they were completely covered in sauce.
- Serve with ice cream or custard.
- Bask in glory at the wonderful thing you have made.
- Eat.

What the Caked Crusader chose to bake to this week (13 Oct 2007)

Fancied a bit of acoustic music this week. To my ears there are few modern albums better than Roddy Frame’s “Surf”. So many albums are over-produced to the point that they sound like they were made in a laboratory rather than studio, all the humanity is removed; if the internet is to be believed, Roddy Frame recorded this album in his front room – just him and his guitar. It’s a quiet album, thoughtful and spare; a rare instance where the lyrics and tunes are of equal quality.
The standout track for me is “Big Ben”. I don’t know why but I always picture him standing on Westminster Bridge on a cold dark night whilst singing it – it has that feel to it, very atmospheric.

Monday 8 October 2007

Lemon cake with crunchy topping

Being the lovely person that I am, I sometimes make cakes with ingredients I don’t like but that others do. I have no idea why I loathe lemons as much as I do, there are no bad experiences I can point to as the reason. But I do loath it – it’s acidic and biting and yuck. And best suited to making cleaning products. However, most people seem to love it and I have been told that this is a lovely cake if you like that sort of thing.


The sponge is beautiful and golden and particularly light. What elevates this from being just another sponge is the crunchy topping added when the cake is out of the oven but still hot. It is achieved by brushing lemon juice and sugar onto the cake; the lemon juice sinks in and moistens the cake whereas the sugar sits on top and goes crunchy. I’ve tried to capture that in this photo:


It is a very clean and appetising looking cake. Perfect with a cup of tea or coffee.


Ingredients:
For the cake:
250g unsalted butter
200g caster sugar
2 teaspoons finely grated lemon rind
4 eggs, lightly beaten
250g self raising flour
1 teaspoon baking powder
2 tablespoons lemon juice

For the topping:
60ml lemon juice
125g caster sugar

How to make:

- Preheat the oven to 170°C/fan oven 150°C/325°F/Gas mark 3. Lightly grease and line a 23cm square tin.
- Cream the butter and sugar together until pale and fluffy.
- Beat in the lemon rind and then gradually add the egg, beating thoroughly after each addition.
- Using a large metal spoon, fold in the flour, baking powder and lemon juice. Stir until combined and smooth.
- Spoon the mixture into the prepared tin and level the surface.
- Bake for approx 1 hour 20 minutes or until a skewer comes out clean. Mine took exactly 1 hour 20 minutes.
- Remove from the tin while still hot and place on a wire cooling rack.
- For the topping, mix the sugar and lemon juice together (don’t overmix as you don’t want the sugar to dissolve) and quickly brush over the top of the cake. It will seem like you have too much liquid but just keep brushing it on and it will absorb.
- Leave to cool.
- Bask in glory at the wonderful thing you have made.
- Eat.

Chocolate mud cake

It’s October, it’s cold, it’s dark, it’s miserable. Bring on the chocolate cake! This weekend I felt that chocolate cake was the order of the day to boost spirits. And this is a chocolate cake, not one of those disappointing efforts with a hint of cocoa powder in it that just turns the sponge a bit brown.

Chocolate is a bringer of joy. It gave me even more joy when I saw that each bar of Green & Black’s chocolate that I bought came with a free taster bar of cherry chocolate. Some days it’s all good.

This cake has a lot of chocolate in it as well as cocoa powder. And then, in case you were worried it might not be quite chocolate-y enough, it’s covered with a chocolate icing. Here it is before the icing has set – it’s so glossy and mirror-like that you can see a reflection of the plug socket on the wall:


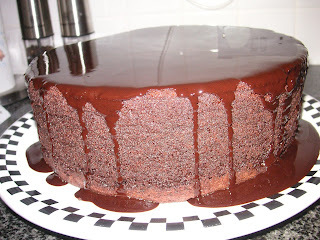
Make no mistake – this is a big cake. When I took it out of the oven I was stunned at just how much it had risen and assumed that it would sink a bit, as most squidgy cakes do. It didn’t. It remained as proud as it was straight from the oven. Just to repeat: some days it’s all good. Here it is nude:


And here’s how it looked before icing. You’ll notice that I flipped the cake – so the top, which goes a bit craggy during baking, becomes the bottom. The advantage to this is that you get a perfect flat surface to pour your icing over; it makes the result that little bit more professional looking.


Before it sets the icing is shiny – it reminded me of a freshly opened conker. This is a cake that benefits from good ingredients (not that I’d ever advocate using bad ingredients). Buy the best quality chocolate you can – I used Green & Black’s 70% cocoa content; any higher percentage than this and it will be too bitter.


One thing I did find was that this cake takes hours to cool down so make it early in the day if you intend to keep it in an airtight container and serve the next day. The cake will keep for several days but you must refrigerate it.

The last thing I would say is that, on glancing down the ingredients list you might think that this looks a rich and sweet cake. I’m not going to lie and say it isn’t but it’s nowhere near as heavy as you might expect and is very, very eatable!

Ingredients:
For the cake:
250g unsalted butter
250g dark chocolate (I used 70% cocoa content Green & Black)
150g self raising flour
150g plain flour
60g cocoa powder (I used Green & Black)
½ teaspoon bicarbonate of soda
550g caster sugar
4 eggs, lightly beaten
2 tablespoons of oil (I used ground nut oil but any light oil will do)
125ml buttermilk

For the glaze/icing:
150g unsalted butter
150g dark chocolate

How to make:
- preheat oven to 160°C/fan oven 140°C/315°F/ Gas mark 2-3 and grease a 23cm springform or loose bottomed cake tin. Line the tin with greaseproof paper and ensure that paper comes up at least 2 inches above the rim of the tin as this cake rises a lot and you’ll be heartbroken if it overflows and sticks to the base of your oven.
- Put the butter, chocolate and 185ml of hot water into a saucepan and stir over a low heat until smooth. Remove from the heat.
- Place the flour, cocoa and bicarbonate of soda into a large bowl and stir in the sugar. Don’t panic at the amount of sugar – it’s there to take the bitterness out of the chocolate.
- Make a well in the centre of the dry mix and add the eggs, oil and buttermilk. Using a large metal spoon, or using an electric beater on a low setting, combine.
- Little by little, add the chocolate butter mix to the bowl ensuring you combine it thoroughly. I used my kitchen aid for this but a hand held electric beater will be fine. You can do it by hand but the sheer volume of the mix will make it hard work.
- Pour the mixture into the prepared tin and bake for 1 hour 45 minutes or until a skewer comes out virtually clean. The cake is squidgy so you don’t want a completely clean skewer. Mine took just under 2 hours.
- Leave to cool in tin. Remove from the tin when completely cold.
- Now make the icing. Melt the butter and chocolate together over a low heat.
- Leave to cool slightly – if you pour it over the cake at this point it will be too thin and you won’t get a nice thick covering on the top and sides. It takes quite a while to cool and thicken.
- Pour over the cake and allow it to run down the sides.
- Bask in glory at the wonderful thing you have made.
- Eat.

What the Caked Crusader chose to bake to this week (6 Oct 2007)

I love Tom Waits. I love that if you listen to his albums on shuffle, it sounds like several different artists. You start with the smooth crooning, then progress to more bluesy fiery work then he discovers percussion big-time and the now familiar growling and barking style kicks in. He acts his songs too – some songs will be sung in an accent and for one of my favourites, “Jesus Gonna Be Here” he sings it with a lisp. Mad or genius? I know where my vote goes.

The main reason I love Tom Waits, other than you get the sense he could live in an Edward Hopper painting, is his lyrical genius. In an age where so many lazy songwriters trot out the tedious moon/June type of rhymes, he stands out as a poet. Just consider this single line from “Ghosts of a Saturday Night” describing a scene in a bar:

A solitary sailor who spends the facts of his life like small change on strangers

It tells you so much: an entire scene, an entire life in one sentence.

I suspect that Tom Waits probably isn’t a cake fan. A voice like his screams of bourbon and cigarettes rather than cream puffs, but he is great music to bake to.

Tuesday 2 October 2007

Sticky Ginger Cake - You say YES!!!

I'm proud to say that I know of several of you out there who have made, or will be making, the sticky ginger cake

I received this very encouraging email from Fiona:
I made one of your ginger cakes on Saturday and it came out so well that I made another one on Sunday and took it to a friend’s party. It all disappeared within minutes and everyone said it was wonderful!

This is great news - The world needs more cake!!! Everyone - get baking!

Monday 1 October 2007

Vanilla Tart

I have a confession to make – my name is the Caked Crusader and I am a Vanillaholic. I think vanilla is the greatest flavour there is; nothing can ever be ‘too vanilla-ry’ (yes, I have just made that word up) for me and it breaks my heart that in banking & finance, vanilla is used as a term to mean bland, straightforward and basic – the opposite of exotic.

This tart ticks all the boxes as it’s really a vanilla-heavy version of a custard tart. Pastry always has a classy elegance to it and when it’s made with icing sugar and an egg yolk, is incredibly soft and smooth. I admit this is not a cake – I don’t want you to think that I have abandoned cakes - it’s served in the same way that you would serve a cake so I think I’m allowed to admire it. This tart is beautiful with a cup of tea or as a dessert. I have made it as one large tart but it would be lovely as smaller, individual tarts:


The smell of the tart baking drove me half out of my mind – delicious vanilla and cream and buttery pastry. I almost attacked it with a fork as soon as it came out of the oven! It’s like a slice of sunshine – both the pastry and filling are golden and bright:


This isn’t one to make when you’re pushed for time as there are several stages to the process. However, don’t confuse that with it being complicated – if you glance at the ‘how to make’ section you’ll see that there’s nothing difficult or fiddly to it at all.

I love rolling out pastry. I think pastry is a bit like small children and animals – if it smells fear in you it will give you a hard time; handle it confidently and it will be easy as pie! Of course it helps if you have the largest rolling pin in the world to tame it with – this was an awesome Christmas present from my equally awesome nephew. To give you a sense of scale, that is a LARGE egg next to it:

How exciting a sight is this? Answer – very! This is the vanilla pods helping the cream to become something even more delicious; you can already see the vanilla seeds dispersing. I am very pleased at how clean my hob looks!:


Ingredients:
For the pastry
200g plain flour
100g unsalted butter, diced
25g icing sugar
1 egg yolk

For the tart filling
568ml double cream
2 vanilla pods
3 eggs plus 1 egg yolk (i.e. in total 4 egg yolks and 3 egg whites)
75g caster sugar

How to make:
- Using your fingertips, rub the butter into the flour until you get the consistency of fine breadcrumbs.
- Stir in the icing sugar then add the egg yolk.
- Gradually work in 2-3 tablespoons of cold water until the dough comes together and is soft and smooth. Add the water one tablespoon at a time as you probably won’t need all three. If you add too much water and the dough becomes sticky, sprinkle in an extra pinch of flour.
- Make the pastry into a ball. Place it on a sheet of clingfilm and then press it down so it becomes discus-shaped – I find this makes it much easier to roll out as the pastry doesn’t crack around the edges as much. Then wrap and chill for 30 minutes.
- Roll out the pastry between two sheets of baking/greaseproof paper. This means you don’t need to flour the board and I love this method as you’re not introducing more flour to the pastry and unbalancing the mix. Clingfilm works too.
- Roll the pastry out to line a 25cm tart tin. The tin needs to be at least 2.5cm deep to hold all the filling.
- Prick the pastry base with a fork and chill for a further 20 minutes. This helps to limit the pastry shrinkage on baking.
- Preheat the oven to 200°C/fan oven 180°C/Gas mark 6.
- Line the pastry with baking/greaseproof paper and baking beans and blind-bake for 15 minutes. Remove the paper and beans and bake for a further 8-10 minutes until the pastry is a light golden colour. Leave to cool.
- Lower the oven temperature to 150°C/fan oven 130°C/Gas mark 2.
- Pour the cream into the saucepan and add the vanilla pods (cut the pods in half lengthways first to allow the seeds to mingle with the cream).
- Bring slowly to the boil then leave to cool – this is when the vanilla will really infuse the cream and the smell in the kitchen is lovely!
- Beat the eggs, egg yolk and sugar. Add the vanilla cream mix – pour it through a sieve to ensure you thoroughly remove the vanilla pod.
- At this point, I added a dash of vanilla extract – this is optional.
- Pour the mixture into the pastry case and bake in the oven for 30-35 minutes or until the custard mix is very softly set. Mine took about 45 minutes. The custard continues to firm as it cools so don’t over bake it.
- Remove from the oven and cool in tin.
- Bask in glory at the wonderful thing you have made.
- Eat.

Raspberry and Almond Cake

There is something about raspberries and almonds together that just works. The tart juicy berries cut though the sweet nuttiness and both flavours benefit. Any cake where ground almonds replace some of the flour is delicious, moist and denser in texture and this one is no exception however, and this may sound contradictory, it manages to be light at the same time i.e. you don’t feel like you’ve eaten a house brick. I’m hoping that as it contains fruit and nuts it can be classified as a health food – perhaps even helping you meet your ‘five a day’ requirement…..ok, maybe not!

As you can see it’s quite an imposing, formal looking cake:


I love it when a cake has hidden treasure that cannot be seen from the outside; cooked raspberries turn a beautiful jewel-like colour:


So, that’s the fruit requirement covered, but it’s also important to get some dairy – good for the teeth and bones. This is how I like to keep osteoporosis at bay:


It is simply lightly whipped cream with vanilla added to taste.

Ingredients:
250g unsalted butter
250g golden caster sugar
4 eggs
175g ground almonds
100g self-raising flour
150g fresh raspberries (frozen won’t work as you need them to hold their shape)
50g flaked almonds

How to make:
- preheat oven to 190°C/fan oven 170°C/375°F/ Gas mark 5 and grease a 20cm springform cake tin, lining the base with greaseproof paper.
- Cream the butter and sugar together until smooth and pale.
- Beat in the eggs one at a time, the mixture might curdle towards the end but don’t worry about it.
- Fold in the almonds, flour and raspberries. Try not to mush the raspberries up too much as it looks nicer. If the mix gets too thick add a dash of milk to loosen it. I didn’t have to in the example photographed above.
- Spoon mix into the tin and smooth the top. Scatter the flaked almonds evenly over the top.
- Bake for 40-45 minutes or until a skewer comes out clean. I found it took a bit longer than this but check on it after 40 minutes. Mine took 1 hour 5 minutes in total.
- Leave to cool before removing from the tin. You can dust it with icing sugar before serving.
- I served it with lightly whipped cream.
- Bask in glory at the wonderful thing you have made.
- Eat.

What the Caked Crusader chose to bake to this week (29 Sept 2007)

Ask most people what pops into their mind when they hear the name ‘Fred Astaire’ and the answer will be ‘dancing’. Ask the Caked Crusader, and the answer will be ‘singing’. It amazes me how underrated Fred Astaire’s singing remains; indeed, most people don’t even seem aware what an important vocalist he was in his day. Songwriters such as Irving Berlin (if I could find a way of praising his genius in a cake blog, trust me I would) and Cole Porter passed their new songs to Fred Astaire to sing as they could both hear what most people now, sadly, cannot – that in terms of phrasing, rhythm and simply selling a song, there are few like Fred! It’s been said that no one sings like a drummer or a dancer, because no one understands rhythm quite so well.

I like both aspects of his recordings: there are the big band more formal, strict tempo productions and then the smaller, jazzier, funky arrangements. Whilst baking today I listened to a mix of both but ‘Lady Be Good’ on the Jazztime CD
does deserve a special mention – it’s one of those rare slices of perfection where you hope that the jaunty vocals of Mr A and the smooth jazz of Oscar Peterson’s combo will never end. This CD seems hard to get hold of now with Amazon.Com listing it as unavailable and Amazon.co.uk only having availability via the market place sellers. Whatever you have to pay for it, it’s worth it.